Proper Right Hand Form
Proper Right Hand Technique
Right hand technique is an important part of playing efficiently and effectively. Proper technique ensures that you have control over the rhythms you will play, as well as, the tone that is produced when you strum/pluck notes and chords. In this lesson, we’ll be going over a handful of ways to improve your right hand technique including hand position, strumming, and fingerpicking approaches.
* Note: If you haven’t already, I’d recommend reading our lesson on proper left hand form too.
2 Ways to Position Your Right Hand
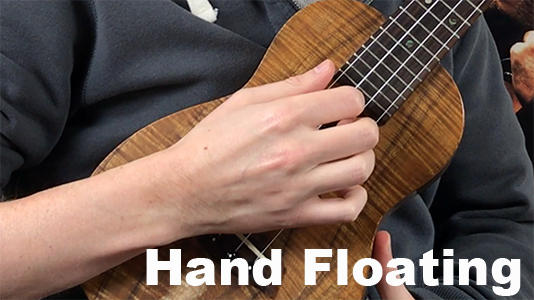
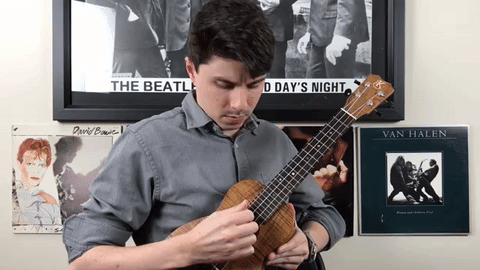
Form 1

In this form, place your pinky on the body of the ukulele (underneath the strings). The rest of your fingers will float above the strings. Position your fingers to the strings as follows:
Ring – A string
Middle – E string
Index – C string
Thumb – G string
Generally, your pinky finger will remain anchored toward the middle to bottom right of the sound hole (dependent on hand position – see below).
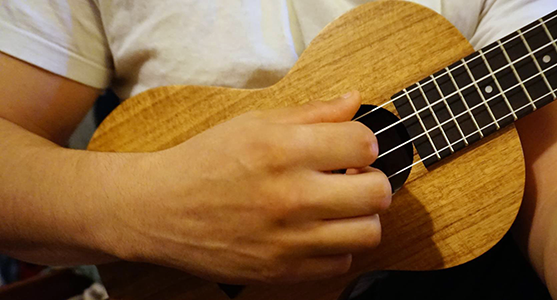
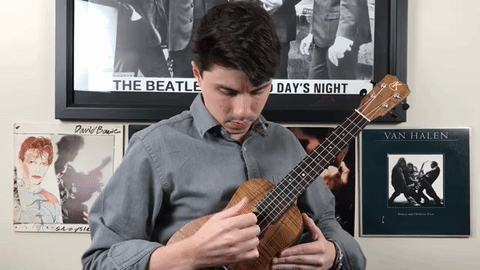
Form 2
Form 2 is very similar to form 1. The only difference is instead of having a finger anchored, all fingers are floating above the strings.
For both forms, your hand will float over the sound hole of the ukulele.
Hand Position
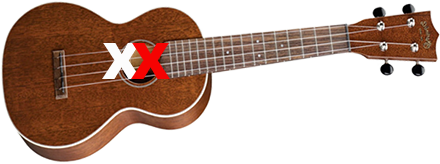
As you can see in the two pictures above, Andrew prefers a hand position that hovers closer to the neck (Red X). Contrast that with the picture below (Form 2), and we can see that Angelo prefers to be slightly further back (White X). There is no right or wrong, it is simply preference.
Which form is best for me? And when should I use Form 1 or Form 2?
Great question! The general answer is: try both out and pick the form that is most comfortable for you. But, let’s dive into some recommendations. Form 1 will be best suited for fingerpicking over strumming. This is because strumming requires more motion, and anchoring your pinky finger on the uke will prohibit this. Thus, generally I would recommend the following:
Form 1: Fingerpicking
Form 2: Fingerpicking and Strumming
What Not To Do:
1) Don’t start off with your fingers curled under the strings. This can slow down your timing and add an unnecessary extra step to your strumming/picking.
2) Don’t start off with your hand resting above the fretboard or at the bridge. This can tamper with the tone and technique of your playing.
2 Different Ways to Strum
Strumming Technique One: The Thumb
Our first technique involves us using the thumb exclusively to strum. With this method, you are going to use the bottom tip of your thumb to strum down. For up strums, use the fleshy edge of your thumb adjacent to the end of your nail. This helps prevent your thumb from getting scooped up (or caught) in the strings while playing.

Strumming Technique Two: The Claw
For this form, bring your thumb, index, middle, and ring fingers together to make a claw. With this technique, we’re going to focus on using our nails for the strumming attack (instead of the flesh part of the fingers). This will produce a much louder sound and brighter tone than achievable with technique 1 (thumb). As you strum down, hit the strings with the nails of your index, middle, and ring fingers. As you strum up, hit the strings with the nail of the thumb.

Which technique is best for me?
It really comes down to two factors: which technique is the most comfortable for you and/or what does the song call for. Remember that the thumb technique produces a softer and warmer tone, while the claw technique provides a brighter (more treble) and louder sound.
3 Different Fingerpicking Approaches
There are many different ways to pick/pluck notes on the uke, but generally they all boil down to being variations on these three approaches.
Approach 1
One way to pick is to use only your thumb to play every note. This can be useful when playing on one string. In this technique, you would use the fleshy edge of your thumb (bottom) to pluck down on the string. Generally, players will pluck down for every note when using this technique.
Approach 2
Another way to fingerpick involves using multiple fingers (3 or 4 fingers). This approach is best used when playing a phrase that involves multiple strings. A 3 finger approach results in us using our thumb for two strings.
Ring (Or Middle) – A string
Middle (Or Index) – E string
Thumb – C string
Thumb – G string
Approach 3
While, a 4 finger approach has us lining our fingers adjacent to the strings as follows:
Ring – A string
Middle – E string
Index – C string
Thumb – G string
In regards to index, middle, and ring fingers: In all 3 approaches we will be plucking the strings with the fleshy part of our fingers in an upward motion. This means that as we pluck, we are bending the middle knuckle of each finger to execute each attack.
In regards to the thumb: Your thumb will remain straight and attack the string(s) in a downward motion by using the fleshy part of the thumb (bottom).
Which approach is best for me?
It depends on the piece that you are performing. Generally, I recommend to focus more-so on approach 2 and 3, because they provide a more efficient way to fingerpick. Our fingerpicking course: Fingerpicking Concepts: An Intro to Fingerstyle Ukulele, is an excellent resource for applying the concepts learned in this article. This course covers the 3 approaches for fingerpicking in complete detail. Furthermore, the 3 approaches will then be applied to exercises and performance pieces intended to help you develop your right hand technique and dexterity. The video below is a sample lesson from the course.
What to Take Away From this Lesson
Proper right hand form is vital to your success as a musician. Often times the left hand gets all the glory as it flys up and down the neck while playing. But, without proper right hand form, performing becomes more challenging and less efficient. Not only that, but tone is controlled by both hands. With an understanding of proper form in both hands, playing cleanly and learning new concepts will become much easier!
Video Lesson – The 3 Approaches For Fingerpicking
Article by: Andrew Hardel